Writing Good Documentation
GitHub Flavored Markdown (GFM) is a variant of the Markdown markup language designed for use on the GitHub platform1. Markdown is a lightweight and easy-to-read plain text format that allows you to format text using a simple and intuitive syntax2.
One of the key advantages of GitHub Flavored Markdown is its versatility and ease of use, making it an excellent choice for creating comprehensive documentation. Whether you’re a developer working on open-source software, a technical writer crafting user guides, or simply looking to improve the clarity of your project’s README, GFM offers a wide range of features to help you present your information in a structured and visually appealing way.
When it comes to documentation, the devil is often in the details. GitHub Flavored Markdown equips you with the tools to enhance your documentation’s readability and utility. In this blog post, we’ll explore some of the most valuable features and best practices for writing clear and effective documentation using GFM.
Step 1 - Use Headers and Sections
Use headers and sections to break down your documentation into manageable and organized chunks. This makes it easier for readers to navigate and find the information they need.
# Getting Started

## Installation

### Step 1: Download the software

### Step 2: Configure your settings
Step 2 - Use Codeblocks with syntax highlight.
Codeblocks in mardkdown allow us to copy, plaste and share core.
A goog Cloud Engineer uses Codeblocks whenever possible, because it allows others to copy and paste their code to replicate or research issues.
- To create a code block in Markdown, you can use triple backticks (```) followed by the programming language (if applicable).
- Not to be confused with quotation (‘)
For example, to create a code block in Python:
`python
def my_function():
    print("Hello, World!")
\`
This will render as:
def my_function():
print("Hello, World!")
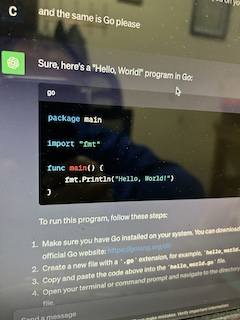
- This is another example for highligthed for GO language
#include <iostream>

int main() {
    std::cout << "Hello, World!" << std::endl;
    return 0;
}
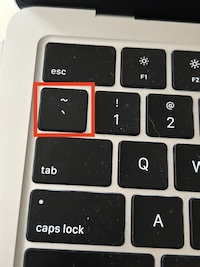
- Make note of where the backtick keyboard key is located
-
It should appear above the tab key, but it may vary based on your keyboard:
- This is an example for a Spanish Windows Keyboard

- This is an example for a English Macbook Keyboard

Good Cloud Engineers use codebocks for both Code and Errors that appear in the console.
Hello, World
panic: runtime error: integer divide by zero

goroutine 1 [running]:
main.main()
        /path/to/your/go/file.go:8 +0x44
exit status 2
Here is an example of using a codeblock for an error that appears in bash
When you can always provide a codeblock instead of a screenshot.
If you need to take a screenshot make sure is not a photo from you phone
There are certain cases where its okay to take photo with your phone, This is when you are showing something like a keyboard, which dows not appear on a computer screen. If it render on your computer screen it should be a screenshot.
Step 3 - How to take screenshots
- A screenshot is when you capture a part of your screen from your laptop, desktop or phone.
- This is not to be confused with take a photo with your phone.
DON’T DO THIS

DO THIS INSTEAD

Step 4 - Use Github Flavored Markdown Task Lists
Github extends Markdown to have a list where you can check off items3.
- Finish Step 1
- Finish Step 2
- Finish Step 3
Step 5 - Use Emojis (Optional)
GitHub Flavored Markdown supports emoji shurtcuts4. Here are some examples:
| Name | Shortcut | Emoji |
|---|---|---|
| Cloud | :cloud: |
:cloud: |
| Cloud with Lightning | :cloud_with_lightning: |
:cloud_with_lightning: |
| Fire | :fire: |
:fire: |
Step 6 - How to Create a Table
You can use the following markdown format to create table:
| Name | Shortcut | Emoji |
| --- | --- | --- |
| Cloud | `:cloud:` | :cloud: |
| Cloud with Lightning | `:cloud_with_lightning:` | :cloud_with_lightning: |
| Fire | `:fire:` | :fire: |
Github extends the functionality of Markdown tables to provide more alignment and table cell formatting options 5:
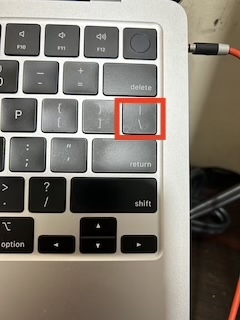
- Make note of where the pipe keyboard key is located
- It should appear above the return or enter key , but it may vary based on your keyboard:

Step 7 - Use Links and Cross-References
Link to other sections within your documentation or reference external resources. Mentioning GitHub issues and users within your repository also creates contextual links for discussion and collaboration.
For more details, see the How To Learn and Don’t Forget or any other reference here.